SQL Server agent
Use a SQL Server agent in Data Integration to move data between SQL Server and Prophix. This supports both inbound and outbound integrations and streamlines recurring data refreshes.
A SQL Server agent can be used as a source and can serve as a destination for:
- Excel
- MySQL
- ODBC/ODBC32
- SQL Server
- Text
A SQL Server agent can support the following sources:
- SQL Server 2019
- SQL Server 2017
- SQL Server 2016
- SQL Server 2014
- SQL Server 2012
- SQL Server 2008 R2
Add a SQL Server agent
To create a SQL Server agent, see Add an agent.
Tip: Use clear names like “Finance – SQL Server” or “Fabric – Warehouse (Service Principal)” to simplify downstream selection.
Add a connection
To add a connection for a SQL Server agent:
- In the navigation panel, select Admin Setup.
- Select a SQL Server agent or peer connection, and click > Add Connection.
- Connection Name must be unique. Up to 40 characters.
- Authentication: Choose of these options:
- Windows or SQL
- For SQL Authentication, the Username and Password: Up to 128 characters.
- Server and Database: Up to 128 characters.
- SSL: On by default. Turns on SSL mode requirement.
- Click OK.
Microsoft Entra Service Principal Authentication (for Fabric SQL endpoints)
For Authentication, select Microsoft Entra Service Principal Authentication.
Fabric Endpoint: If the endpoint is Fabric, set to True. If not, set to False.
Workspace SQL Endpoint: Paste the Fabric SQL endpoint URL.
Workspace Item: the Warehouse or Lakehouse name.
Client ID: Application (client) ID from your Entra app registration.
Client Secret: Active client secret for the app registration.
Click Test Connection to validate credentials and access.
Click Save.
- Windows or SQL
Client secrets are case-senstive. Ensure that the secret is active, and rotate per your organization’s policy.
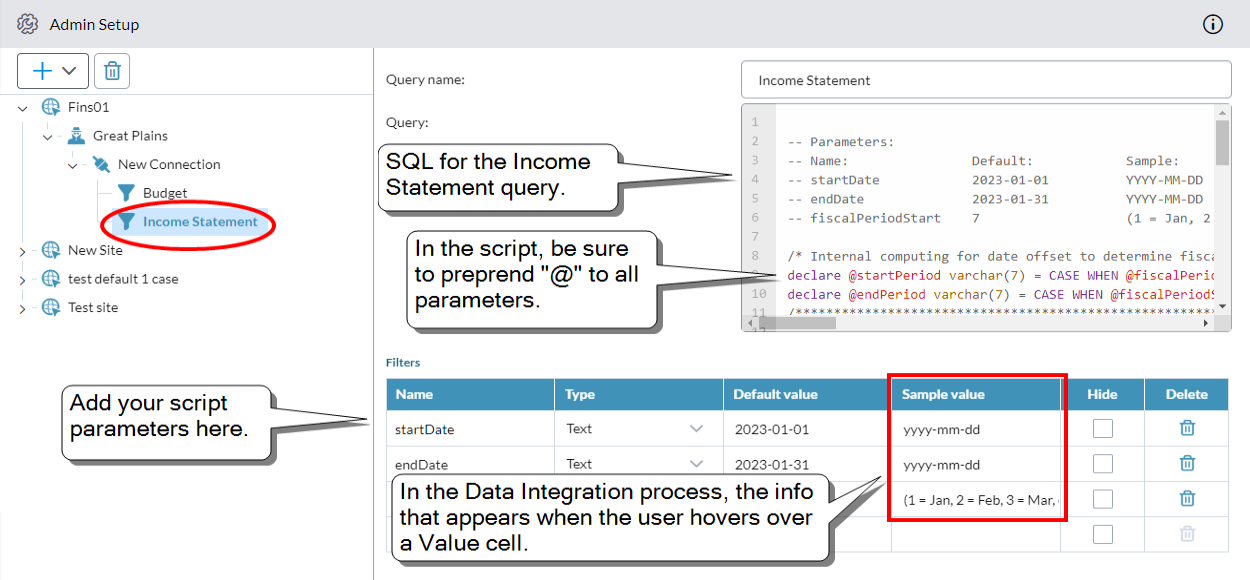
Add a SQL query
- Select a SQL connection, and click > Add Query.
- Query Name must be unique. Up to 40 characters.
-
In Query, type or paste your SQL.
Note: The SQL must be compatible with your ERP.
Example of a query with parameters:

Note: If your query uses parameters, within the SQL text, you must preprend @ to each parameter name. For example, startDate must appear as @startDate.
- If the query has parameters, add them to the Filters table:
Name: The parameter name. Up to 50 characters.
Tip: In the filter table, don't prepend "@" to the parameter names.
- Type: The parameter's data type (text or numeric). (For date values choose text.)
- Default value: What the user sees in the Data Integration process and can edit. Up to 50 characters.
- Sample value: What the user sees when hovering over the cell in the Data Integration process. Use it to show the expected input/format. For example, YYYY-MM-DD for date formats to reduce user input errors. Up to 50 characters.
- Hide: Turn on if you want to keep users of the Data Integration process from seeing the parameter, while using its Default value in the query.
- Click Save.